With her precise edging and smooth finishes, Melbourne pastry chef Krista Corbett could have made a name for herself as a concreter. Thankfully, for the celebration cake world, butter cream is Krista’s finish of choice. We asked her to guide us through the process of decorating cakes using Buttercream watercolour technique.
Krista Corbett is a Melbourne pastry chef. Since completing her apprenticeship under mentor Daniel Wilson, she has worked as a pastry chef at The Graham, Huxtable Restaurant, Chez Dre, Zumbo Café and Tivoli Road Bakery. Krista specialises in celebration cakes and enjoys playing with flavour, composition, texture and appearance. Her ethos of using ingredients that are organic and locally sourced shows through in her cakes, which not only look amazing but taste great too. Krista has an interest in using native Australian flavours in her cakes.

WHAT TO DO
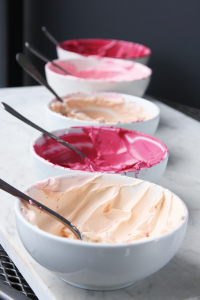
ONE: Choosing the colour palette
I like to use one colour—let’s say pink or green or blue—and then work with different shades of that colour. Between three and five colours is a good number and it’s good to have light and dark shades to get that contrast. You might use one out-there shade as your accent, which is really bright or really dark.
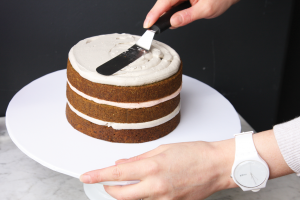
TWO: Cutting the layers
The more work you put into the construction—the more perfect you make it—the easier your job is at the end. I use a cake turntable for the whole process. When I’m cutting the layers I use a ruler and make a mark at two centimetres. I move the turntable around really slowly and make an arc. Then I’ll line up the serrated knife and while I’m turning the table, slowly cut into the cake until I get to the middle and then all the way through.
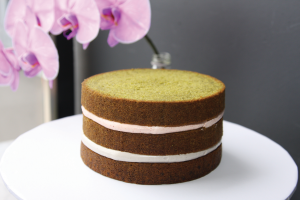
THREE: Constructing the layers
I’ve used butter cream in between the layers but you could use ganache, curd or whatever you think is going to work with the flavours of your cake. I’ve used two flavours: black sesame and strawberry. You can just use one colour or flavour but I thought with this particular cake, because it’s a matcha cake, the flavour balance works really well. It’s also really nice to have that contrast of colour when you cut into the cake.
Pipe the butter cream as evenly as you can and smooth it over to ensure a level surface with no air pockets. If you have air in your cake, it can show through when you’re smoothing the outside coat; you can get little air bubbles. So, when I put the next cake layer on I give it a really good push so that any air pockets will make their way out.
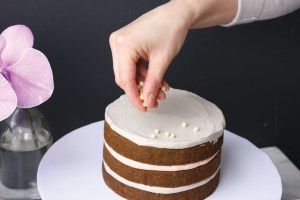
FOUR: Crunch Layer
I usually have some sort of crunch element in my cake because I think it’s nice to get a bit of texture rather than just cake and smooth butter cream. Once you’ve sprinkled whatever you’re using on, push it into the butter cream and do a thin smooth over with the palette knife to make sure they’re totally enclosed. You can add anything you want; I’ve used crumble that’s coated in chocolate and cocoa butter so it stays crunchy. Just make sure it’s enclosed and not going to leave a gap between the cake and the butter cream.
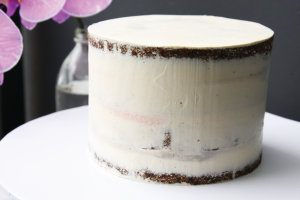
FIVE: Crumb coat
Once you’ve put all the butter cream and layers together you’re ready for the crumb coat. This coat sticks all of the crumbs to the cake so they’re not going to show through in the last layer.
To make the crumb coat, I pipe a layer of butter cream, filling any gaps I can see, and smooth it with a palette knife and a scraper. It’s a really thin layer to cover all of the exposed cake. At this stage it looks like a naked cake because that’s exactly what it is.
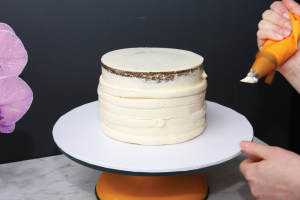
 SIX: Base Coat
This layer needs to be as smooth and as cream as possible—sharp edges are a must—as this coat is our blank canvas. Pipe the butter cream around the edges of the cake quite thickly. Use a decent amount because, as we create the smooth surface, we’re going to gradually take most of it back off.
Use a palette knife to smooth it over really roughly to make sure there are no air pockets. Then use a tall scraper—I use a chocolate scraper usually used for tempering chocolate. It’s a good tool because it’s a little bit flexible but it’s also easy to get that 90-degree angle. I gradually turn the table at the same time as bringing the cake scraper towards me.
Once you’ve got a relatively flat surface you can use a piping bag to fill in any places where there’s not enough butter cream. Quite often I’ll find heaps at the top and heaps at the bottom and none in the middle.
Then again, I’ll turn the table really slowly and hold the scraper at a 90 degree angle. This stage is what takes most of the butter cream off.
I’ll go around once and then I’ll go around twice and you might find that you have a couple of little air pockets or a couple of places where you need to fill in a bit more butter cream. I’ll fill it with a piping bag and keep scraping it. It usually takes me four or five rounds to get it nice and smooth.
SEVEN: Creating the edge
As you scrape off the butter cream you create an edge around the top of the cake. Once you’ve created that edge, put the entire cake in the freezer or fridge (freezer for ten minutes or fridge for half an hour) until the butter cream is hard cold.
Then use a hot knife—you could use a paring knife or even a filleting knife—to cut the edge off. Hold the knife parallel to the cake so it’s nice and flat and move the turntable around until you’ve got a flat edge. If at any point it’s getting a bit soft, put the cake back in the freezer again for ten minutes, take it out, shed up the butter cream again and smooth it over. Keep working at it until you get a flush and perfect sharp edge.

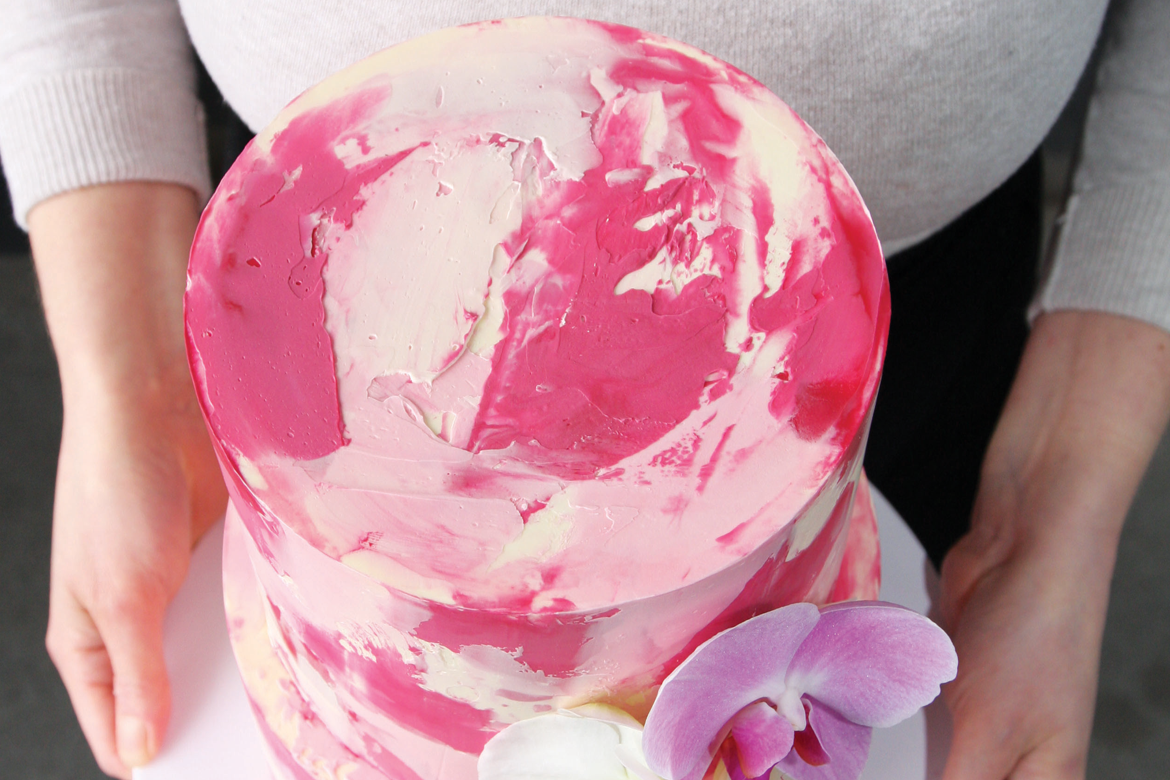
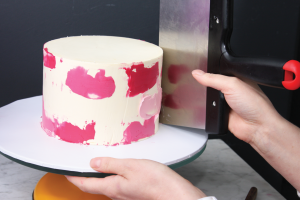
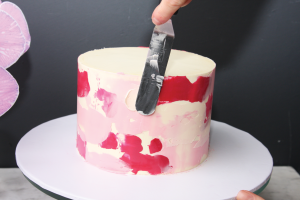
EIGHT: Watercolour layer
It’s really important to make sure you’re happy with the base coat because from there you’re just adding the design. Pop the cake back in the freezer or fridge so the butter cream’s really cold.
With the watercolour technique we’re adding multiple layers of coloured butter cream to create shape, texture and the finished design. The cake needs to be quite cold or the butter cream will smear into the base coat and there’ll be no definition between the colours.
Start adding the colours from lightest to darkest. Take the light shade and use the palette knife to put on a relatively thin layer. Roughly move the knife around to create whatever shape you want. Don’t be too scared about what you’re doing. When I was starting to do this technique I’d be really careful about the shapes; I was trying to create something really perfect. Then I realised the beauty of this design is that it’s so imperfect; it’s not perfect and it’s not smooth but that’s what I love so much about this technique.
Move around the cake with your first shade, and use the scraper to take off any excess colour and to create a relatively smooth surface. Then move on to your next shade. I usually add two or three colours before the butter cream on the base layer starts getting soft. As soon as you can see the colour starting to smear, put the cake back in the freezer.
Give it five minutes or so in the freezer, bring it out and start adding your next colour. The aim is to fill all of the space on the cake where you can see your base coat. Once you’ve filled all the space you can add another couple of layers so you have a bit of overlap and a bit of different texture and shape.
The top is the exact same technique as the sides; just do colour by colour and use the palette knife to smooth it as best as you can. I do the whole top of the cake, even if it’s going to have another cake stacked on top, but you could just cover around the edge if you wanted to.
Creating the edge is the same process as the base coat. You won’t create such a huge edge around the top like we did on the first scrape, but you will still create one. Again, chill the cake and either cut the edge off with a hot knife or use the palette knife to smooth it back onto the top of the cake.
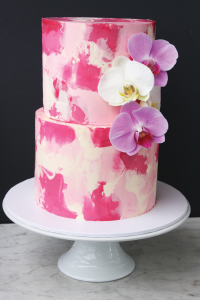
NINE: Flowers
I always chose a neutral coloured fresh flower for the watercolour pattern. For me, the watercolour is very striking so it’s nice to have a flower that doesn’t take away from the design.
I use flower tape and wire. Wind the flower tape around the stem until it’s fully enclosed in the tape (the tape is food safe), then you can put the tape and the wire all the way in to the cake to attach the flower.

COMMENTS