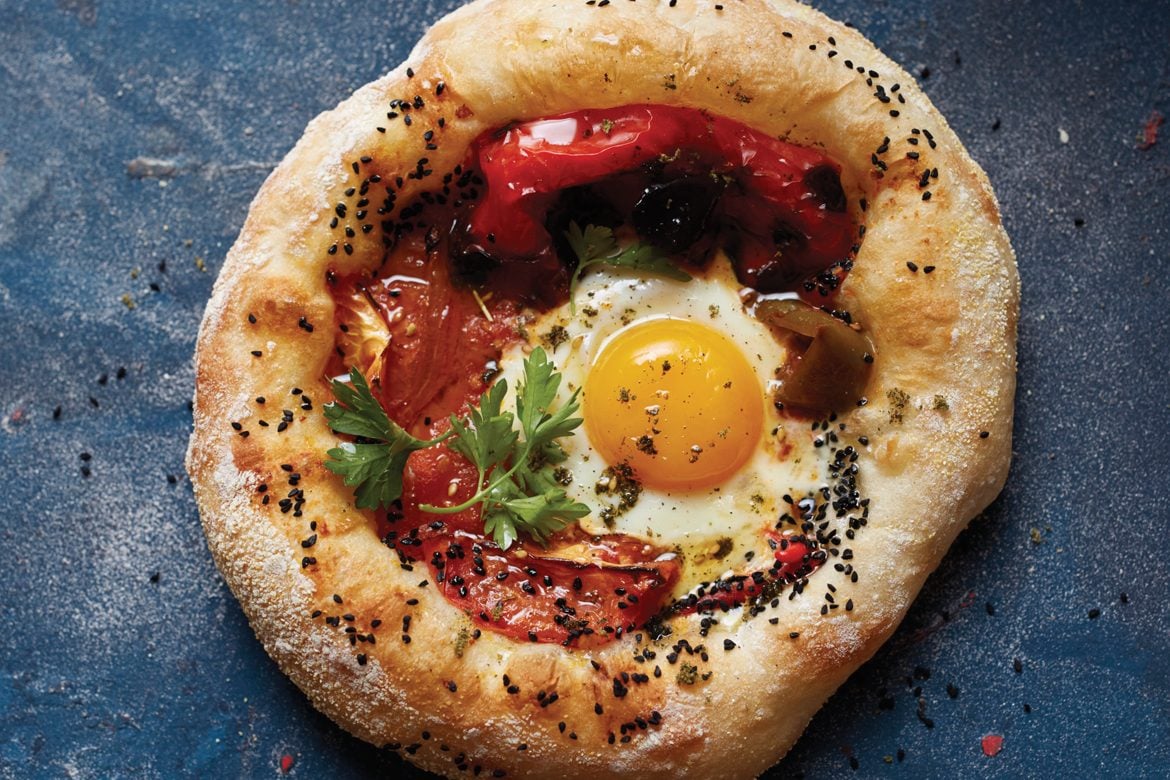
One of Israel’s most famous dishes is shakshuka focaccia, a humble meal of eggs poached in a concentration of sautéed tomatoes and onions. Here, Uri Scheft uses a round of focaccia as a plate, topping it with matbucha (tomatoes, onion, and garlic cooked until quite thick) and a cracked egg in the centre. A flavoursome, hearty, grab-and-go meal, perfect for bakeries.
Serving Size
Makes 6
Cook Time
10 Minutes
WHAT YOU NEED
All-purpose flour (sifted, 11.7%) for shaping
1 recipe no-knead shakshuka focaccia dough (see below)
Extra-virgin olive oil, as needed
1 recipe matbucha (see below)
40g sesame seeds or nigella seeds
6 large eggs
Fine salt, as needed
15g fresh flat-leaf parsley leaves, finely chopped
WHAT TO DO
- Stretch and divide the dough: Heavily flour your work surface. Use a plastic dough scraper to lift and transfer the dough to the floured surface, and flour the top of the dough (don’t be cheap with the flour!). Gently lift, pull, and stretch the dough into a 14-by-8-inch rectangle. Use a bench scraper to divide the dough in half lengthwise so you have 2 long strips, and then divide the strips into 3 pieces each for a total of 6 pieces. Fold the 4 corners of each piece of dough up and onto the centre, creating a round shape; then flip the dough over.
- Proof the dough: Place the balls of dough on a heavily floured pan (or leave them on your work surface) and cover with a kitchen towel. Set aside in a warm, draft-free spot to rest until you see a few bubbles on the surface of the dough and each piece of dough has increased in volume by 50%, about 30 minutes (or a little less or a little longer depending on the temperature of the dough and the temperature of your kitchen).
- While the dough is proofing, place a pizza stone in the oven and preheat the oven to 260°C. (If you have another sheet pan, you can use that instead. If the sheet pan is rimmed, turn it upside down so you have a completely flat surface. The heat from the oven may cause the pan to warp slightly, but it will flatten out after it comes out of the oven). You want the stone to be very hot when you put the bread in, so even after the oven is up to temperature, continue to let the stone heat for at least 30 minutes longer before baking the shakshuka focaccia.
- Shape and season the shakshuka focaccia: Place a long sheet of parchment paper on a pizza peel, flour the parchment lightly, and place 2 pieces of dough on top. If you don’t have a pizza peel, you can place the parchment and dough rounds onto a large cutting board, an upside-down sheet pan, or even a large piece of cardboard. Slide the parchment (and dough) onto the hot stone just as you would do with a peel. Pour 1 tablespoon of olive oil into a small bowl and dip your fingertips in it; press your fingers into the centre of the dough and press down, creating a flat depression in the centre like a bowl. Widen the base of the depression until you stretch it into a circle, leaving a 1-inch border around the edges of the dough (most of the dough will end up being flat, with a tall “wall” around the edges).
- Repeat with the other piece. Return to the first piece and re-flatten the well in the centre, making it as thin as possible, then add about 1/3 cup of the matbucha sauce to the centre, spreading it out slightly. Sprinkle the sesame seeds around the edges of the dough (try not to get them in the matbucha). Quickly make a little well in the centre of the sauce, pressing down into the dough, and crack an egg into the depression. Sprinkle salt over the top.
- Bake the Shakshuka Focaccia: Slide the dough-topped sheet of parchment onto the hot baking stone. Bake until the breads are browned and the eggs are set, 9 to 10 minutes. Slide the parchment onto a wire rack and drizzle the breads with more olive oil. Repeat with the other pieces of dough, and then sprinkle the parsley over them all. Serve warm, while the yolks are runny, or at room temperature (the yolks will harden as they cool).

For the no-knead shakshuka focaccia dough
WHAT YOU NEED
680g cool room-temperature water
10g fresh yeast, or 3g active dry yeast
850g all-purpose flour (sifted, 11.7%) or “00” pizza flour, plus extra for dusting and kneading
10g granulated sugar
10g fine salt
Extra-virgin olive oil, as needed
Fresh oregano, finely chopped, as needed
Sesame seeds, as needed
Coarse salt, as needed
WHAT TO DO
- Pour the water into a large bowl. If you are using fresh yeast, crumble the yeast into the water and whisk until it is completely dissolved (since there is no kneading, it’s very important that the yeast be completely dissolved). If you are using active dry yeast, mix the yeast into the flour. Then, in this order, add the flour, sugar, and salt to the water in the bowl. Use your hand to swirl the ingredients together; then use a plastic dough scraper to scrape down the sides and bottom of the bowl. Continue to mix the dough by hand in the bowl (it’s very sticky, so you’re really just scooping it away from the sides of the bowl with a cupped hand and folding it on top of itself) until there aren’t any clumps, about 1 minute. Cover the bowl with plastic wrap and set it aside at room temperature until the dough has relaxed into the bowl and risen slightly (not a lot happens visually in this stage), about 30 minutes.
- Stretch and fold the dough: Remove the plastic wrap and drizzle a little olive oil around the edges of the dough and over your hands. Use a dough scraper to help you grab one-quarter of the dough, stretch it up, and flop it over onto itself without pressing down on the dough. You’re really just gently folding the edges onto the middle, giving the dough 4 folds without pressing on it, which would release the gas in the dough. Slide the dough scraper under the dough and turn it over. Cover the bowl with plastic wrap and set it aside for about 20 minutes, until, when you grab a small knob of the dough, you can see that there is a little gluten development, but if you stretch it too far, it rips easily.
- Repeat the folding of 4 “corners” as you did in step 2. Turn the dough over again and let it rest for 20 minutes. After this rest, it will look a bit smoother, and when a small piece of dough is stretched, you should be able to feel and see a lot of gluten development.
For the Matbucha
WHAT YOU NEED
12 tomatoes
30g extra-virgin olive oil
6 garlic cloves, slivered
1 or 2 jalapeños or serrano chiles, quartered lengthwise; seeded if desired for less heat
20g fine salt
1 teaspoon granulated sugar
WHAT TO DO
- Bring a large pot of water to a boil. Fill a large bowl with ice and water and set it aside.
- Put a small X in the bottom of each tomato. Blanch the tomatoes in the boiling water until the skin at the X starts to curl, about 2 minutes (if the tomatoes are very under-ripe, they may need a minute or two longer; if they are very ripe, check at 30 seconds to 1 minute). Use a slotted spoon to transfer the tomatoes to the bowl of ice water.
- Heat the olive oil in a large saucepan over medium-low heat. Add the garlic and jalapeños and cook, stirring often, until the garlic is lightly golden, 5 to 7 minutes. Reduce the heat to low.
- Drain the cooled tomatoes. Peel the skin off a tomato, and holding the tomato over the saucepan, shred it with your fingers so the pieces drop into the pan. Repeat with the remaining tomatoes; then stir in the salt and the sugar (if using). Cook the tomato mixture, stirring every 5 to 10 minutes, until the liquid has completely evaporated and the tomatoes have broken down to a jam-like consistency, about 1½ hours.
- Let the matbucha cool a bit and serve it warm, at room temperature, or cold. Refrigerate the matbucha in an airtight container for up to 1 week.


COMMENTS