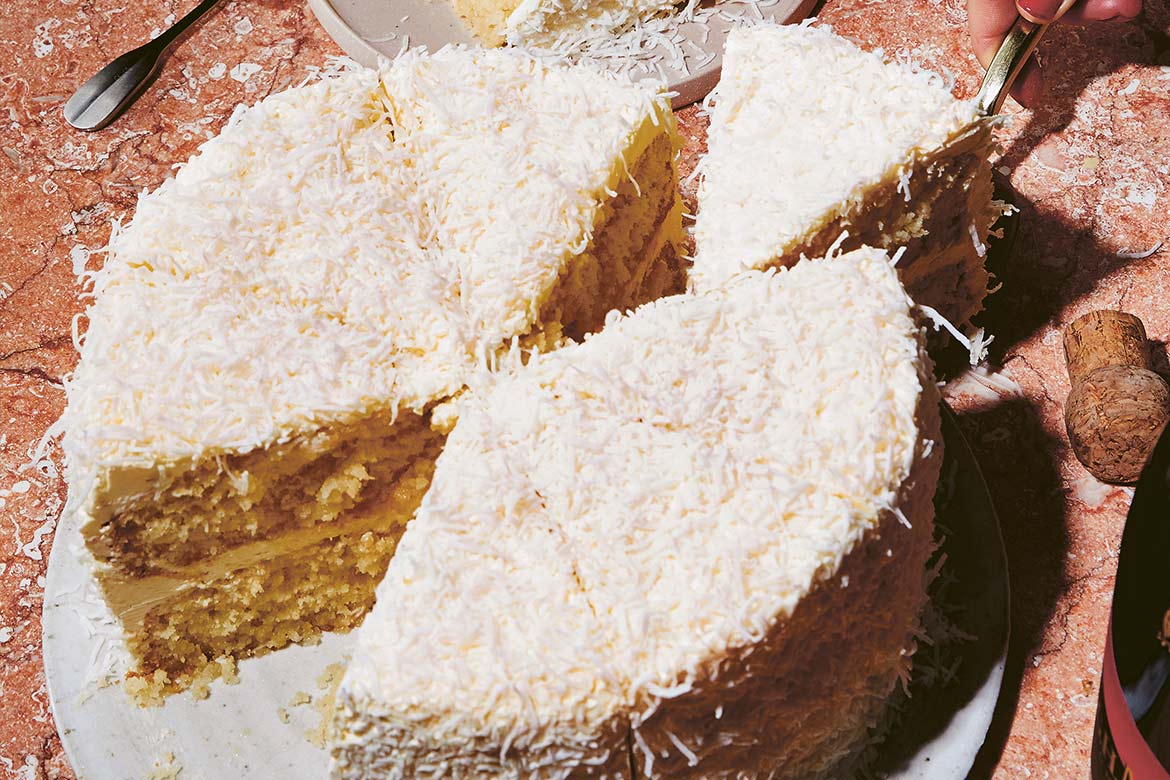
This is a Cypriot recipe that Emelia Jackson’s mum makes all the time. She bakes hers in a loaf tin and it never lasts long; however, it’s one of those cakes that just keeps getting better over time as the syrup absorbs into the cake. As such, it’s the perfect cake to make ahead for that lovely stress-free feeling. Bake it in a loaf, round or rectangular tin – it really doesn’t matter.
Makes a 20cm two-layer cake
WHAT YOU NEED
For the cake
5 eggs
180g caster sugar
1 tsp vanilla bean paste
½–1 tsp coconut extract
150ml full-cream milk
150ml neutral-flavoured oil, such as grapeseed oil
350g self-raising flour
1 tsp baking powder
125g desiccated coconut
150g shredded coconut, to decorate
For the lemon syrup
390g caster sugar
Rind of 1 lemon, cut into strips
For the coconut Swiss meringue buttercream
400g caster (superfine) sugar
200g egg whites
350g unsalted butter, softened
3/4 tsp coconut extract
WHAT TO DO
For the coconut syrup cake
For the syrup, combine the sugar, lemon rind, and 390ml water in a saucepan. Bring to the boil over medium heat, without stirring, and cook until the sugar has dissolved. Turn off the heat and allow the syrup to cool while you get on with the cake.
Preheat the oven to 170°C. Line two 20cm cake tins with baking paper.
Using an electric mixer fitted with the whisk attachment, whisk the eggs, sugar, vanilla, and coconut extract until doubled in volume and light in colour. Pour in the milk and oil and mix until just combined.
Sift the flour and baking powder over the egg mixture and gently fold together until just combined. Finally, fold in the desiccated coconut.
Split the batter between the cake tins and bake for 55–65 minutes or until a skewer inserted into the centre of the cakes comes out clean. Use the skewer to poke holes in the hot cakes, right through to the base of the tin.
Discard the lemon rind from the cooled syrup and evenly pour the syrup over the hot cake. (Syruping rule of thumb: hot cake/cold syrup or cold cake/hot syrup. This ensures that the syrup absorbs well and doesn’t pool on the top of the cake, which is what usually happens if both the cake and syrup are cold.) Set the cake aside for 1–2 hours to allow the syrup to penetrate.
For the buttercream, combine the sugar and egg whites in the heatproof bowl of your electric mixer. Sit the bowl over a saucepan of simmering water (don’t let the water touch the bowl) and cook, stirring constantly, until the sugar has completely dissolved or the temperature reaches 70°C on a sugar thermometer.
Use the whisk attachment of the mixer to whisk the mixture until a thick meringue forms and the bowl is cool to touch. Switch to the paddle attachment and add the butter and coconut extract. Mix for a good 7–10 minutes or until the buttercream is smooth and silky. (If the buttercream appears split, it’s usually because the butter is too cold. It will come together with more mixing, so just keep going!)
Refer to the instructions below to layer and assemble the cake. Once the cake has been iced with the buttercream, completely cover it with the shredded coconut.
For the layering, icing, and decorating
Layering a cake
If you’re baking one of the layer cakes in this book, Emelia highly recommends baking the cake in layers rather than in one larger cake that you then split into layers. Why? Less time in the oven means less evaporation of moisture content, which results in a moister cake. That’s why Emelia recommends having two or three of each size of cake tin.
Torting a cake is when you level off the dome from the top of a cake, then slice the cake into level horizontal layers in order to fill it with icings or other fillings. It may seem unnecessary, but achieving level layers will ensure that the final cake is stable and even – no lopsided cakes here!
There are a few ways you can tort a cake. You can buy a cake leveller, which takes all of the guesswork out of the process (the Agbay is amazing). Otherwise you can sit the cake on a turntable and use a ruler and a long, serrated knife.
Torting a cake
Using the ruler, measure the height of the cake. Once I remove any dome, that usually leaves a cake that’s 7.5cm tall. Hold the ruler against the side of the cake and mark with the knife where you are going to trim. If the cake is 9cm tall, mark the cake at 7.5cm, and use the serrated knife to slice off the top of the cake. (Cake tops make great snacks while decorating.)
Make several marks around the side of the 7.5cm tall cake to indicate the halfway point before slicing all the way through with the long, serrated knife. This will ensure that you get two straight layers of cake.
Take a little of your buttercream, icing, or ganache and spread it on the base of the cake board, acting as glue to secure the cake. Place your first cake layer on the board and press down firmly.
Top the cake with a generous scoop of buttercream and, using an offset spatula, spread it out until it’s completely flat and smooth.
If you are adding a secondary filling to your cake, such as jam, curd, ganache, or salted caramel, you will need to pipe a ‘dam’ to ensure the filling doesn’t leak out of the side of the cake. Spoon some of the buttercream into a piping bag and snip off 1cm from the tip. Pipe the buttercream around the perimeter of the top of the cake, creating a dam wall. You can now add the secondary filling.
Place your second layer of cake on top of the first and lightly press down to seal. Repeat step 4, making sure the layers are aligned and straight. Keep repeating steps 4 to 6 if you have more than two cake layers.
Bend down so you are at eye level with the top of your cake and press around the edge to straighten the cake. Don’t press too hard, though – you don’t want the filling to spill out.
Take the offset spatula and spread the excess buttercream over the side of the cake, locking in any crumbs. This is called a crumb coat (or, if you’re an Aussie like Emelia, a dirty ice). Place your cake in the fridge for 30 minutes or the freezer for 10 minutes. This will help set the icing and create stability.
Icing the cake
Your cake is filled and stacked, it’s been crumb coated, and is chilled and stable. It’s top coat time.
There are two methods that are used most often to achieve a crisp, sharp buttercream edge.
- The lidded method for smooth buttercream
- The slicing or knife method
Emelia like to use the slicing method because she finds it’s more efficient, there’s less wastage and, once you master it, it’s generally easier.
Place your cake on a turntable. Fill your piping bag with buttercream, icing, or ganache and pipe an even layer of icing around the entire cake, including the top.
Hold an offset spatula at a 45-degree angle, with the offset section in the centre of the cake, as you carefully and slowly turn the cake turntable, removing the excess buttercream and flattening the top of the cake. When you are happy with the top of the cake, move onto the side.
Take a flat scraper and hold it against the base of the cake board. Carefully and methodically begin scraping the cake to remove the excess buttercream, slowly turning the turntable as you go. In between each swipe of the scraper, remove all of the excess buttercream and clean the scraper. Clean tools mean clean results!
Continue scraping the scraper around the cake, slowly turning the turntable, until the side of the cake is flat and smooth, with no sneaky cake peeking out from the buttercream. This will have created a ridge around the top of the cake, which is what you want at this stage. Once you are happy with the side of the cake, place it in the fridge for at least 30 minutes or in the freezer for 10 minutes to set the buttercream ridge.
The cake is chilled and the buttercream ridge is hard … it’s time to slice. Get yourself a cup of hot water from the kettle, a tea towel and a small, sharp paring knife (Emilia love using Victorinox knives because the blades are thin and sharp). Dip your knife in the hot water and then dry it off. Take the warm knife and slowly slice off the buttercream ridge until the knife is flush with the top of the cake. Slow and steady is the key here – it’s not a race! Slice off small sections at a time and remove the excess buttercream, cleaning and heating the knife in between each cut.
And, just like that, your cake is iced! In the words of singer Aaliyah, ‘if at first you don’t succeed, then dust yourself off and try again. You can dust it off and try again, try again.’
If you are struggling with the finishes of your cakes, garnishes are your friends. Coconut cake buttercream not quite perfect? Coat the sides in shredded coconut and it’s all good. Chocolate cake looking a little sad? A dusting of cocoa powder will fix that straight up. Your glaze isn’t everything you dreamed of? Pile that cake with fresh berries and grated chocolate and no one will be any the wiser.


COMMENTS