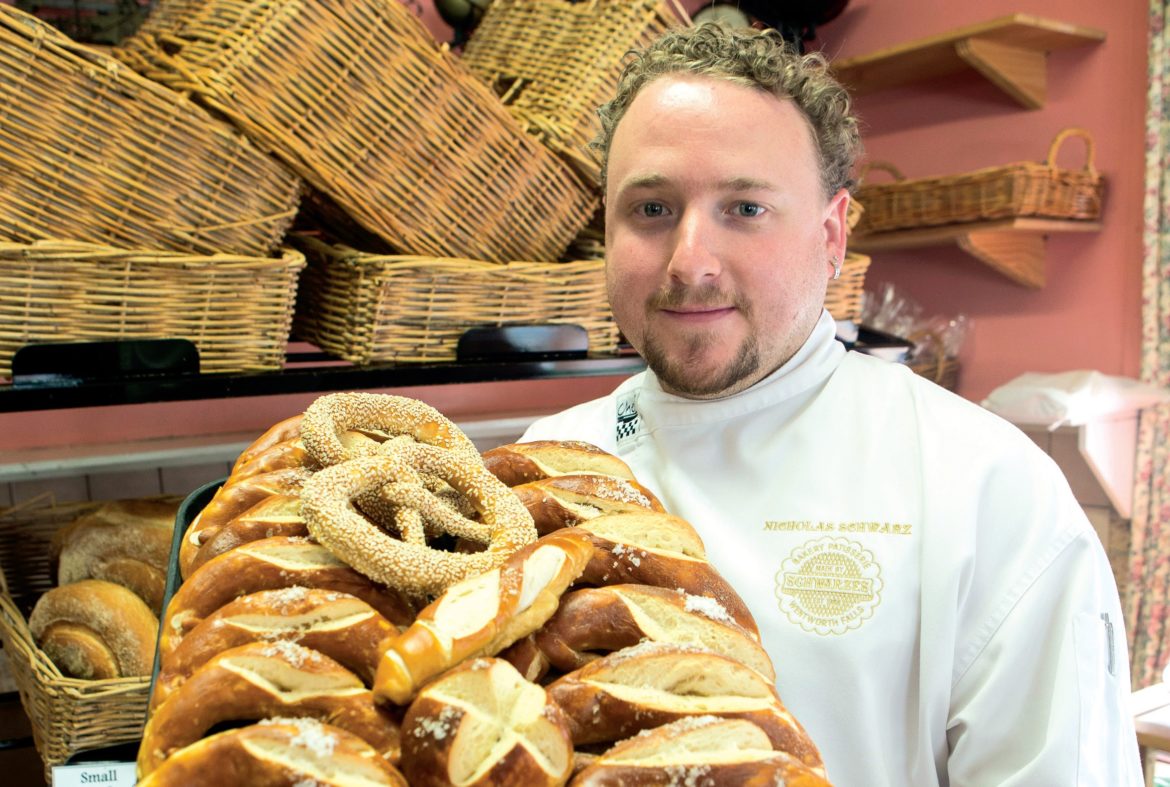
Nick Schwarz shows Australian Baking Business how to master his traditional German pretzel recipe – Schwarz Patisserie’s number one seller.
Schwarz Pâtisserie has been delighting locals and tourists in the Blue Mountains with black forest torte, strudel and rye bread for almost 25 years. Having been passed down to owner Nick Schwarz from his German-born father Alexander, who ran the business until 10 years ago, all products are made according to traditional recipes.
As Nick says, pretzels aren’t the hardest recipe to follow, but if you get them right, they’ll simply run out the door.
“Pretzels date back to the olden days, where there wasn’t any the fancy bakery equipment or ingredients. The dough itself is basic, but the recipe is all in the technique. You can tell a good pretzel immediately just by looking at its shape,” he says.
“We sell a couple of hundred of pretzels in the shop every day. They are massively popular with both customers and festival organisers, increasingly as German festivals such as Oktoberfest gain legs around the country.”
For centuries, German publicans have handed out pretezels to help punters soak up excess alcohol. Knowing this, it shouldn’t be a surprise Nick says they go well with beer.
“Australia has a great drinking culture, just like the Germans. We love barbecues and we love beer, so it makes sense we would adopt this kind of bakery product,” he says.
“Of course, they don’t have to be served up with beer. Traditionally, they have been eaten for breakfast, served hot with butter and jam, or eaten for dinner with a tray of cold meats. Personally, I think the best way to enjoy a pretzel is hot, with butter. It’s delicious!”
German Pretzels
WHAT YOU NEED
Dough (scaled in 2kg cuts):
2kg white bakers flours
40g salt
Sea salt to taste (Schwarz Pâtisserie use Maldon Sea Salt)
50g lard or butter
100g fresh yeast or 50g dry yeast
800-1000ml cold water (not icy)
Dipping solution
It’s best to make the dipping solution 24-hours before preparation so it can cool down to room temperature and the bi carb soda and salt can fully dissolve. Pour the dry ingredients into a bottle – a milk bottle or a soft drink bottle – and pour in the warm water and let it sit overnight. If the solution is still warm when you put your pretzels in, they will fall apart.
500ml warm water (warmer than 45°C)
3 tablespoons bi carb soda
1 tablespoon salt

What to DO
1. Preheat oven to 240°C;
2. Prepare a bench with plastic;
3. Put your dry ingredients in a mixing bowl – flour, salt, lard and yeast – and turn on the
machine and let them combine as a dry ingredient mix;

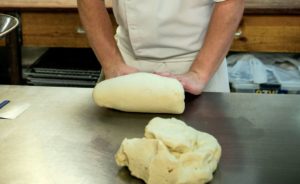
4. Add half of your cold water until the ingredients combine. Add the rest of the water until you achieve a tight consistency. When it’s firm to touch and the dough is developed, (you’re looking for a dough window) take the dough out of the machine and cut into 2kg cuts;
5. Knead the dough into two cob loaves and rest on the bench covered in plastic until it doubles in size (abut 20-30 minutes depending on the temperature. In the Blue Mountains, where it is usually quite cool, we don’t have to rush);
6. Press the dough out on a plate with an even consistency and roll it through a bun divider. We have a machine called the D30 Bun Divider, which gives us 30 pieces

7. Take two pieces, squash them together and slightly roll them lengthwise to about 10cm. Cover in plastic and rest for about 10 minutes;
8. Put grease-proof paper down on a baking tray or baking wire;
9. Take the 10cm lengths of dough and roll them again so they are about 25cm. The arms need to be thinner and the centre needs to be thicker. Place the dough to the side and rest or about four minutes;
10. Take the 25cm lengths of dough and roll them out again to about 40cm, keeping the centre thicker than the arms, spin it and twist in the air and place it back down on the bench;
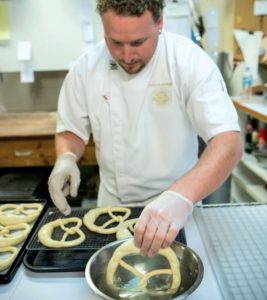
11. Place the arms at 10am and 2pm (when thinking of a clock) to get the shape and place on a baking tray or wire lined with grease-proof paper. Repeat until all the dough is shaped;
12. Place in the fridge until they set and harden up (usually about 20-30 minutes). They need to cool rapidly until they are firm enough to be able to pick up off the grease-proof paper without falling apart;
13. When cooled, set up your dipping/ solution station – this involves setting up a bench space with butchers paper (or whatever you have handy). In the centre, set up a straining wire. Place a bowl where the solution will be poured into. On your left hand side place your cold pretzels and on your right hand side place your baking tray with silicone paper on it;
14. With your left hand place the pretzel into the solution and with your right hand, remove the pretzel from the solution and place on the straining wire (we can fit about three pretzels on the wire). Let the pretzels drip off for a few seconds.
15. Take them from the strainer to the baking tray (we fit about 13 pretzels to a tray);
16. Take your paring knife and cut the fat part of the pretzel (the split will open in the baking process), use sea salt flakes and sprinkle a generous amount (probably a tablespoon’s worth) on the fat part of the pretzel; and
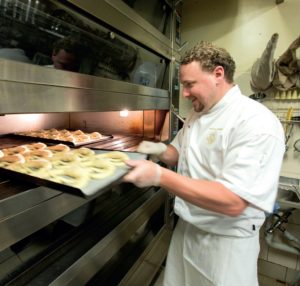
17. Place your pretzels in the oven, which has been pre-heated to 240°C. Leave your damper (or airlock) open. Bake for 15-20 minutes until golden brown. As the pretzel cracks on, along cut line, take them out of the oven and allow to cool.
Notes
• It’s all about the development of the dough. It’s not meant to be like bread dough, it needs to be nice and tight. It’s more like modelling dough – firm plasticine consistency. You need to get this right and it will take trial and error to get this right if you haven’t made pretzels before.
• It’s very important to make the solution 24 hours in advance, or at least so it’s at room temperature. When you make trays and trays full of pretzels, as we do, it’s all about time and speed. Because you have to handle it so many times, the idea behind placing the dough in the cool room before dipping in the water/bi carb and salt solution is so they are irm enough to just grab, dip and place in the oven with minimum fuss. If you don’t put them in the cool room, they stay very soft and elastic-like, and fall apart when dipped in the solution.

COMMENTS