Dean Gibson has been building Chocolate sculptures for 17 years. His first chocolate Showpiece piece was for the 1999 Coupe du Monde Patisserie and he’s considered a leader in this field.
Dean has trained under some of the greatest modern artists in Chocolate Showpiece including Stephane Leroux, Stéphane Glacier, Frank Haasnoot, Jeroen Goossens, Johan Martin, Julien Alvarez and Australian master chocolatier Kirsten Tibballs.
As a teacher of the pastry, chocolate and bakery arts, Dean passes his expertise to many other students and competitors who seek him out to be mentored and trained in this very complex field.
“The first thing I always do with a competitor is the 10 steps to designing and building showpieces,” Dean said.
“If you can stick to this program and complete the timed trials, you will be very prepared for a competition.”
Dean’s 10 Steps for Planning and Building a Chocolate Show Piece
1. Select a theme
Normally building and making a showpiece is determined by rules and regulations in competition. However, I still select a theme that is both interesting to me, and something that can be portrayed in an abstract way in a sculpture. If it is a competition, this step is about meeting all rules and regulations in both theme and dimensions of sculpture.
2. Collect images and research
I spend a lot of time researching the theme in real images, art works and drawings of the objects that will be replicated, and abstract art works in the same field. I continue to refine the search as I build individual components in later steps.
3. Draw the sculpture with colour
Draft a reduced-scale drawing with the suggested colour, then isolate the components and draw with suggested moulds/shapes.
4. Build full-scale sculpture from other material
Build a full-scale sculpture with parts out of cardboard, plastic, wire, sticky tape, beach balls and really any item that fits the shapes required and aren’t too heavy. This is a critical step as it gives the competitor direction on movement, volume, balance, any height and width restrictions, and planned construction on the components, such as the main base and smaller detail. It’s also an opportunity to test the limits of balance and a chance for feedback on the proposed structure.
I keep the model during the process to remind me of the original concept. Colour the ‘other material’ sculpture with coloured aerosol spray paint to start the colour theme.

5. Build moulds for components and structure
There are many avenues to take when building or purchasing moulds such as cardboard, silicon, gelatine, handcrafted pieces, plastic vacuum, plaster Paris and 3D printing. I find the two controlling factors are time and money. Purchasing moulds can be expensive and require both skill and knowledge of the medium being moulded. Usually technical drawings need to be provided through either hand drawings or computer-aided drawing software programs, which are more accurate.
6. Build structure out of dark chocolate
Probably the most important part of the showpiece is the structure. It has to be strong (not heavy) and not defy gravity. Chocolate Showpiece is an amazing ingredient but I treat it like a very compromising building material, so a strong knowledge on chocolate tempering, temperature and storage is essential. Pick a good strong chocolate – I like using Callebaut 811 as it’s a very strong crystallised chocolate and has good fluidity for construction, shaping, pouring and rolling. I usually go for a dark chocolate (more than 50 per cent). I stay away from milk and white chocolate for structural parts due to the soft nature of those chocolate types.
Assemble the structure to test stability without finer detail. For testing I move it around, rock it, shake it and really assess the integrity of the piece. Expect breaks and imperfections at this stage.
7. Build components
Build and work on each individual component including suggested joinery. I like the Lego concept the best as it’s neat, precise and rules out compromised situations on the competition. I continue to build components to a completed stage.
8. Build full chocolate sculpture
Once you have the full sculpture completed, airbrush to start the colour theme. Assess the neatness, strength, height and width. If the piece needs to be moved, and most do, practice moving the sculpture and placing it down. The best idea is to really treat this as a test dummy. If the piece is to be built in parts, start planning on packaging for each component. Soft-density foam, wooden skewers, cotton wool, bubble wrap and cling wrap are the best choice.
9. Refine and colour all components and structure
This is the rewarding stage as all the planning, testing, and construction of moulds has been completed. A strong knowledge of spray-painting, airbrushing and polishing, including using the right tools, is essential to be competitive.
10. Build piece multiple times
If the sculpture is part of a competition it will be timed trials. Set up an area that replicates the space, conditions and equipment that will be used in the actual event. Do this a minimum four and suggested 13 times. Many small modifications and changes normally happen during this step to enhance piece and become more efficient at full construction.
Dean is currently studying 3D solid works, 3D printing, creative drawing and Photoshop to empower him to produce moulds more accurately.
“For our industry, we need to have an expert on 3D modelling, mould making and printing, not only for the comp stuff, but for small business to be able to create original moulds for cakes, chocolates and pastry as the 3D mouldings and printing technology gets cheaper and more accessible,” Dean said.
“You can already see some examples of 3D printing in Chocolate Showpiece and I see this as a major advancement in the future.”
In The Details
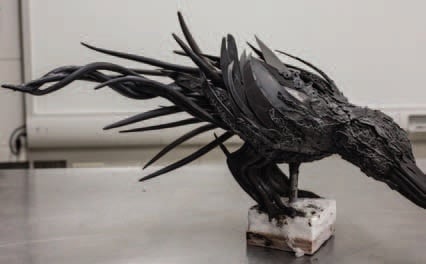
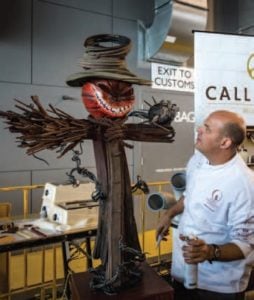
Following the chocolate kraken built last year (pictured), I started planning the scarecrow about four months prior with the idea of doing a piece that was intimidating to both view and build. That meant building something big in size (the scare crow is 1.7m tall and has the arm width of an adult), but still had negative space and also some fine features. As I started to develop the structure, the zombie raven turned out to be the focus and I spent a lot of time working on the zombie bird to really give some spookiness and some zombiness to the final piece. The full structure took 200 hours, with a lot of time spent on the wood effect and the movement of the base. I wanted the scarecrow to look like a roadside fence post and I think the best way to view this piece would be at dusk. I have added a couple of LED lights inside the pumpkin head to make him a bit more sinister and used different toned chocolate on the raven to emulate moonlight.
This is the heaviest Chocolate Showpiece sculpture I have ever constructed, coming in at 30kg of Callebaut Belgium chocolate. The piece has been designed to fit like Lego and all the parts can be attached and detached to allow for movement. This was very complex to actually build, with only balance holding it up for most of the development stages. Only one professional mould was used in the whole structure and all other templates and forms have been constructed out of cardboard, a kids beach ball, silicon paper and plastic.


COMMENTS